


Checkboxes might seem like a small detail, but they make Word documents far more useful and organized.
They help structure information, simplify tracking, and make lists easier to read or complete, especially when used in fillable Word forms.
No matter if you’re preparing a form, managing daily tasks, or building a simple checklist, checkboxes keep everything neat and efficient.
In this guide, I’ll walk you through how to add them properly, format them cleanly, and make sure they work just the way you need – both on-screen and in print.
What are Checkboxes in Microsoft Word?
Before getting into the steps, it’s important to understand what checkboxes are and why they’re used.
In Microsoft Word, checkboxes help organize information and make it easy to mark completed tasks or choices, often alongside dropdown selection fields.
There are two main types of checkboxes you can insert:
| Feature | Clickable | Printable |
|---|---|---|
| Method | Developer tab | Bullet symbol |
| Editable | Yes | No |
| Best for | Forms, digital lists | Paper checklists |
| Platforms | Windows, Mac | All |
| Ease of Setup | Moderate | Very easy |
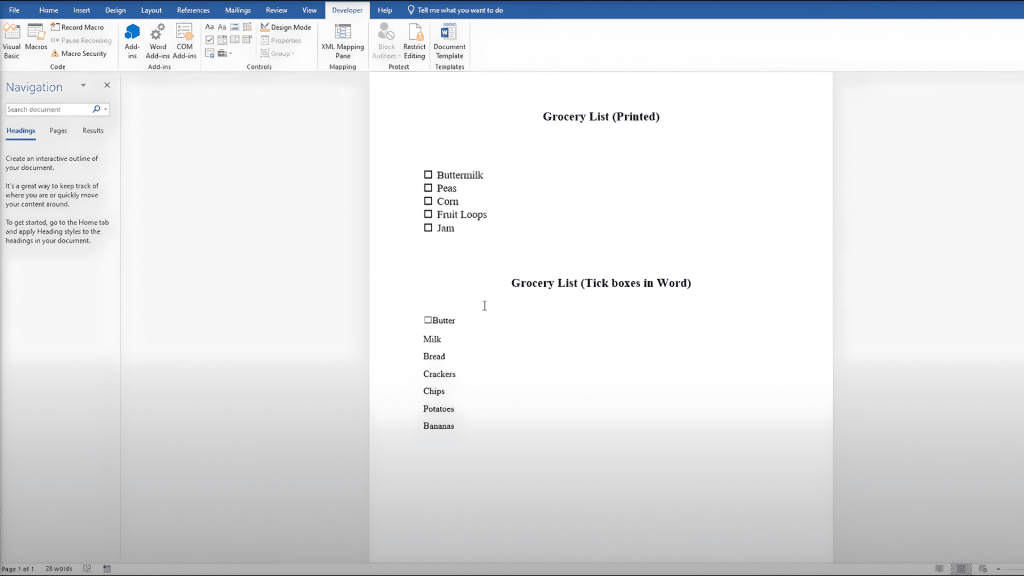
Clickable checkboxes are best for digital use. These boxes can be checked or unchecked directly on-screen, making them ideal for forms, surveys, or electronic task lists.
Printable checkboxes are best for physical documents. These are simple symbols that look like boxes and work well for printed lists or paper checklists.
Choose the type that fits how your document will be used. If it’s something users will fill out on a computer, go with clickable checkboxes. If it’s meant to be printed and checked off by hand, use printable ones.
How to Insert a Checkbox in Word
You can add checkboxes in Word in two ways, depending on your needs when creating effective task checklists.
Use clickable checkboxes for digital lists and printable checkboxes for paper-based checklists. Both are simple to create once you know the right steps:
Inserting Clickable Checkboxes (Interactive Method)
If you want to make checkboxes that users can tick directly on-screen, follow these steps. This method works well for digital forms, to-do lists, or collaborative documents:
Step 1: Enable the Developer Tab

The Developer tab is hidden by default, so you need to enable it manually. Go to File → Options → Customize Ribbon, check the box next to Developer, and click OK.
Once done, the Developer tab will appear in Word’s main toolbar for easy access.
Step 2: Insert Clickable Boxes
Place your cursor where you want a checkbox to appear. Then go to the Developer tab, open the Controls group, and click Checkbox Content Control.
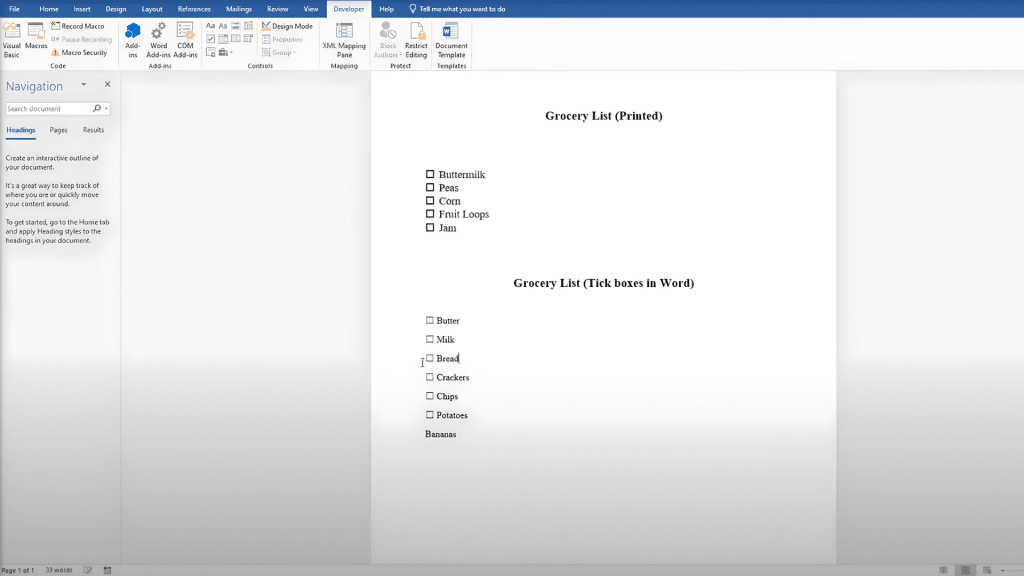
A small box will appear next to your text, allowing users to check or uncheck it directly in the document.
Step 3: Adjust Spacing for a Clean Layout
If the checkbox appears too close to the text, simply click before the word and press the spacebar once or twice. This small adjustment makes the checklist easier to read and gives it a balanced, professional appearance.
Step 4: Copy and Paste to Save Time
To quickly add more checkboxes, highlight one checkbox and the space beside it. Press Ctrl + C to copy it, then move to the next line and press Ctrl + V to paste. Repeat the process for every list item to save time.
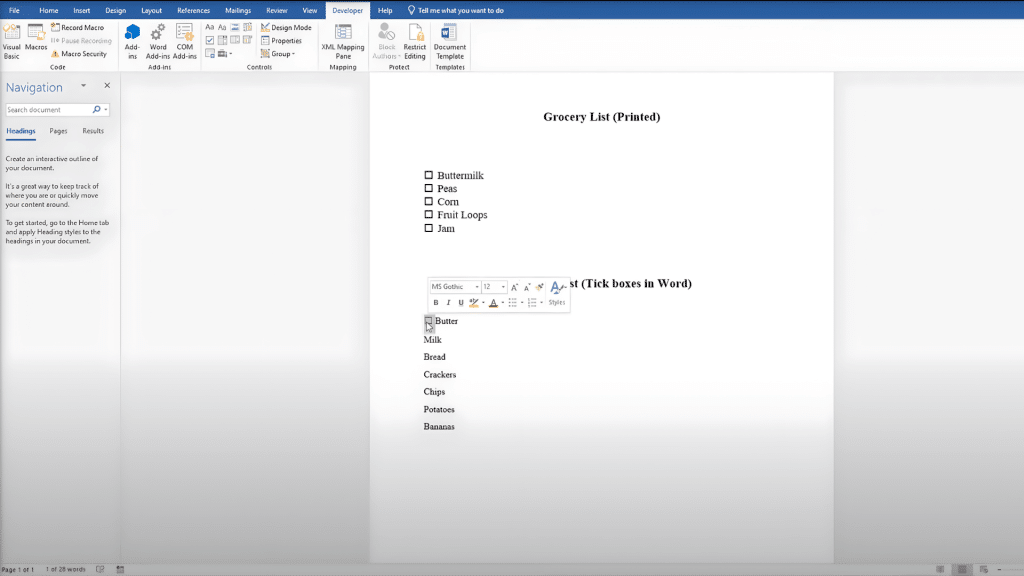
Tip: You can customize the symbol by selecting the checkbox, going to Developer → Properties, and changing the checkmark style from an X to a check mark or another symbol for a cleaner design.
Inserting Printable Checkboxes (For Paper Lists)
This option is perfect for checklists you plan to print and fill out by hand. It uses Word’s built-in bullet feature, so there’s no need to enable the Developer tab:
Step 1: Create Your List
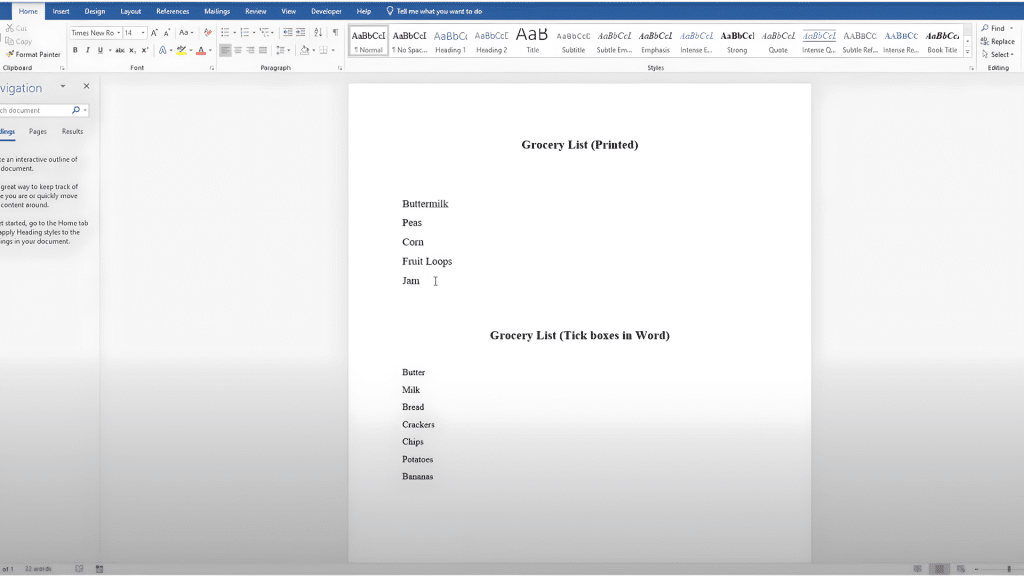
Start by typing all the tasks or items you want to include, placing each one on a separate line. Highlight the entire list so you can apply the same formatting to all items at once for a consistent checklist layout.
Step 2: Open the Bullet Menu
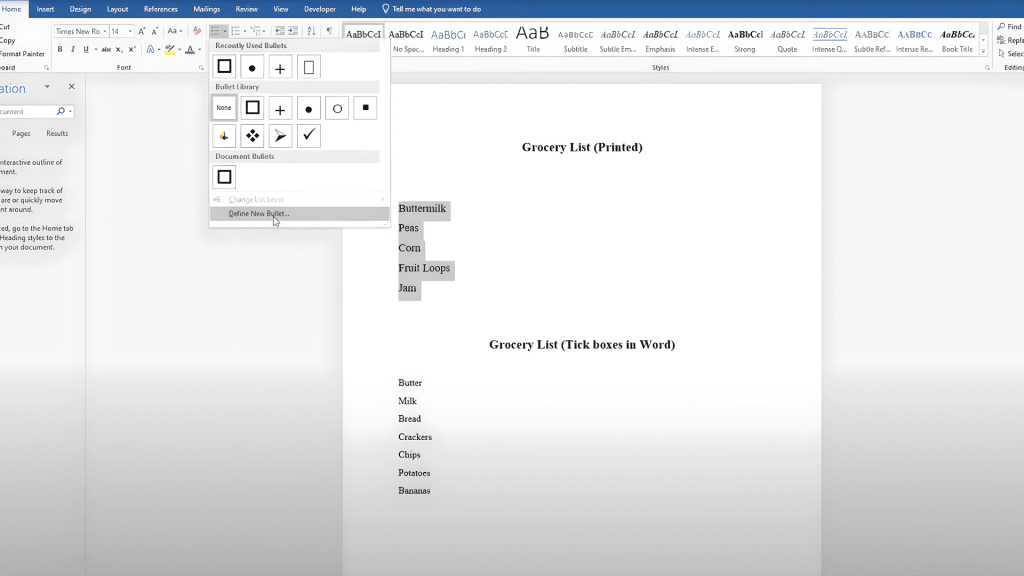
Go to the Home tab, click the small arrow next to the Bullets icon, and choose Define New Bullet. This allows you to replace the standard bullet point with a custom symbol that looks like an empty checkbox.
Step 3: Choose a Checkbox Symbol
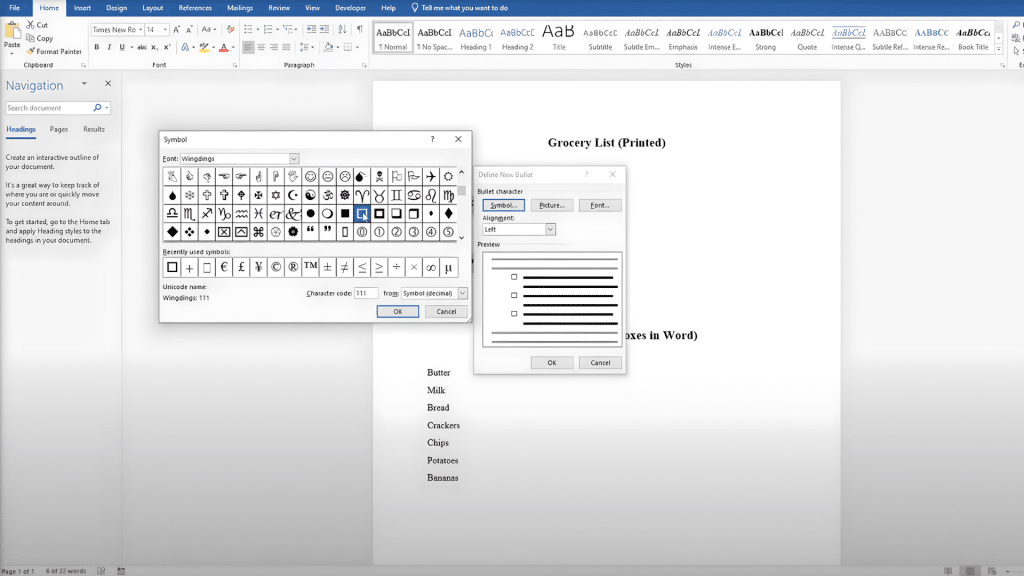
Click Symbol, then choose Wingdings or Webdings as the font. Scroll through until you find an empty square and select it. Click OK twice, and Word will replace your bullets with checkbox symbols automatically.
Step 4: Fix Alignment (Optional)
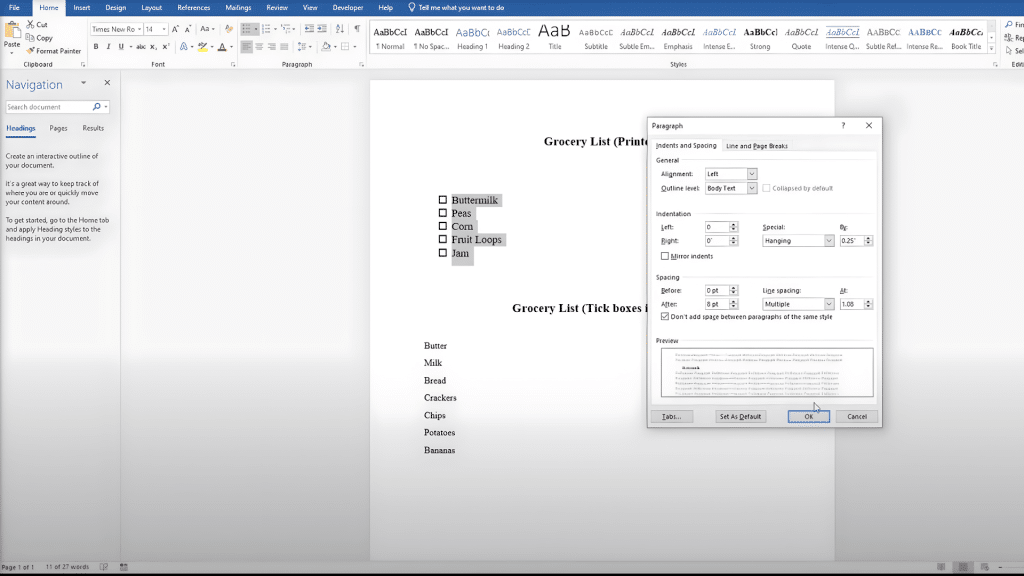
If the boxes appear indented, highlight the list and open Paragraph Settings. Under Indentation, set both left and hanging values to 0 and click OK. This ensures the boxes and text align neatly in straight columns.
Tip: Printable checkboxes work perfectly for daily task lists, sign-off sheets, or paper habit trackers that don’t require digital interaction.
Check out the full tutorial video by @Office titled “How to Insert a Checkbox in Word” to see every step in action.
Formatting and Design Tips
A few small tweaks can make your checklists look cleaner and more professional. Use these tips to keep your layout consistent and easy to read:
- Alignment: Use tabs or tables to align checkboxes and text evenly across the page.
- Spacing: Set line spacing to 1.15 or 1.5 for better readability and a less crowded layout.
- Style: Use bold, color, or headings to group related tasks in longer lists.
- Margins: Leave enough space around your checklist so it doesn’t look cramped when printed or viewed digitally.
- Font Choice: Choose simple fonts like Calibri, Arial, or Segoe UI for a clean, modern appearance.
- Consistency: Keep checkbox sizes, font sizes, and spacing uniform throughout your document for a polished finish.
Keeping your checklist visually balanced helps it feel organized and easy to use. With consistent spacing, clear fonts, and simple styling, your document will look professional both on-screen and in print.
Adding Checkboxes on Mac or Word Online
The process for adding checkboxes depends on which version of Word you’re using. While the steps are similar, there are a few small differences between Word for Mac and Word Online that are good to know.
1. On Mac
Word for Mac supports both clickable and printable checkboxes, but the Developer tab is enabled differently.
Go to Word → Preferences → Ribbon & Toolbar. In the right-hand panel, check Developer and click Save.
You can now use the Developer tab to insert clickable checkboxes, just like in the Windows version.
2. On Word Online
The web version of Word offers limited form controls. You can view existing checkboxes, but can’t insert interactive ones. As a workaround:
Use Symbols (Insert → Symbol) to add square icons. Or create a simple checklist using a two-column table, with one column containing empty boxes and the other listing tasks.
These alternatives work well for lightweight or collaborative documents when the full desktop features aren’t available.
Troubleshooting Common Issues
Even with simple tools like checkboxes, small issues can sometimes cause frustration. Here are a few quick fixes to get everything working smoothly:
- Developer Tab Missing or Greyed Out: Go to File → Options → Customize Ribbon, check the Developer box under Main Tabs, and restart Word if necessary.
- Checkbox Not Clickable: You may have added it as a symbol or bullet. Replace it using the Checkbox Content Control under the Developer tab.
- Checkbox or Text Misaligned: Use the Ruler or Paragraph Settings to adjust indentation and spacing for a clean layout.
These simple fixes should solve most checkbox issues and keep your document looking polished and easy to use.
Practical Use-Cases
Adding checkboxes in Word is a simple way to make your documents more interactive and easier to manage. They help organize tasks, track progress, and maintain structure in both personal and professional files.
- To-do lists and habit trackers: Mark daily goals and routines easily.
- Surveys and digital forms: Collect quick, structured responses.
- Attendance or inventory sheets: Track completion or count items efficiently.
- Team and project templates: Streamline onboarding, reviews, and task tracking.
Overall, checkboxes help you stay organized and make your documents cleaner, clearer, and more functional. They’re a small addition that brings big improvements to how you manage information in Word.
Conclusion
Knowing how to insert a checkbox in Word helps you create well-structured, easy-to-use documents.
You can design interactive forms or printable checklists with just a few simple steps.
Understanding the difference between clickable and printable checkboxes allows you to choose the right method for your needs, whether it’s for professional reports, team projects, or personal planning.
Once you get comfortable with the process, you can reuse your customized layout for future tasks, saving time and effort.