



So you want to take a screenshot on an iPad, and you’re not sure how? Trust me, you’re not alone. It trips up way more people than you’d think.
I am running a few minutes late; my previous meeting is running over. The trick that works on one iPad might do absolutely nothing on another one. Some have that round button; some don’t.
That’s exactly why how to screenshot on iPad gets Googled so much every single day. It should be simple, but Apple kind of made it a little confusing.
This blog covers how to take a screenshot on iPad the quick and easy way, no matter which model you’ve got.
Can Every iPad Take a Screenshot?
Yes, every iPad can take a screenshot, but the process depends on the model you own. The main thing that changes is if your device has a Home button or a full-screen display.
Before taking a screenshot, check these things:
- Home button models: A round button below the screen means your iPad uses the older button setup.
- Face ID models: No button below the display means your iPad has an edge-to-edge screen.
- Newer iPad Pro, Air, and mini models: These usually come without a Home button.
- Older iPad versions: These include the physical Home button below the screen.
Newer iPad Pro, Air, and mini models usually come without a Home button. If you’re still comparing models, looking at iPad Air vs iPad Mini can also help you understand differences in screen size, accessories, and everyday use.
The screenshot feature works across all iPad models, so you only need to match the method with your specific device.
Ways to Take a Screenshot on iPad
There’s more than one way to grab your screen, and that’s a good thing. Here’s how to screenshot on iPad using whichever method fits you best.
All of these line up with Apple’s official support guide, so just pick the one that suits your habits.
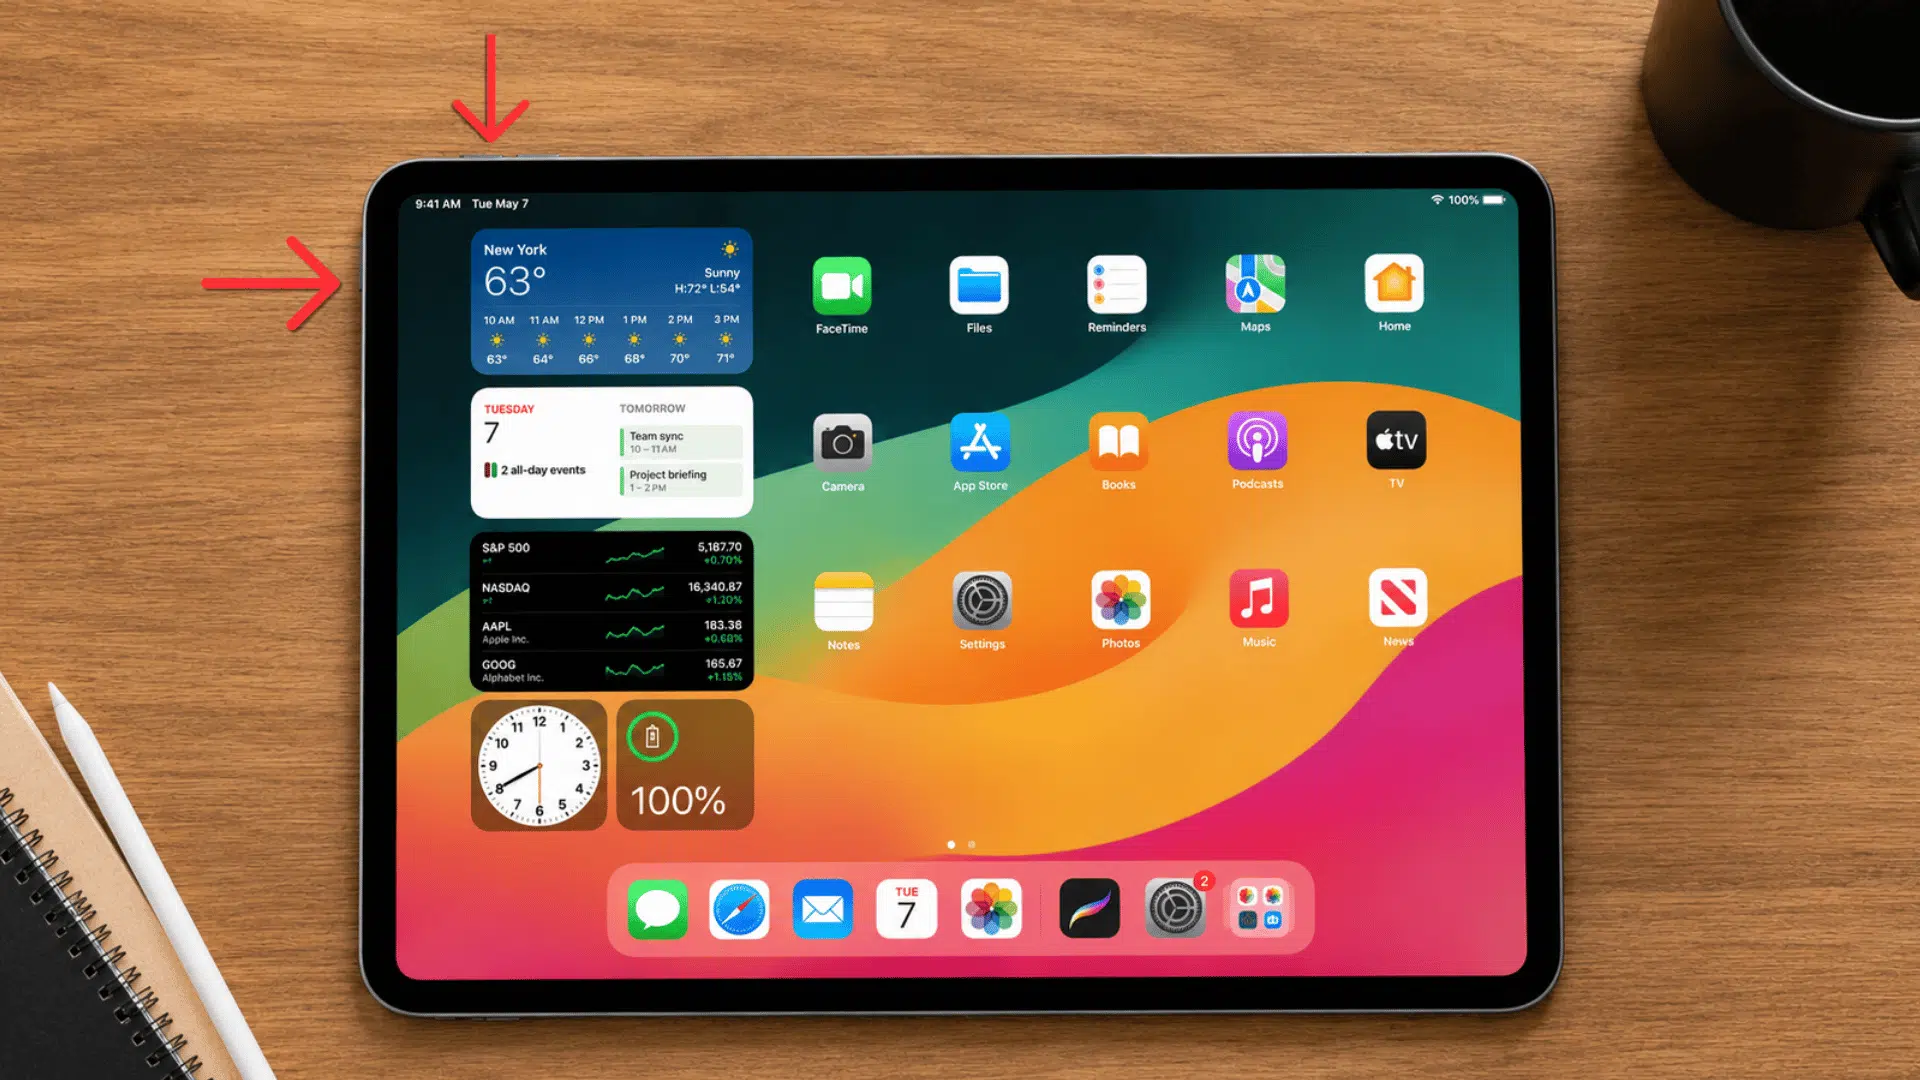
1. The Button Combo for Face ID iPads
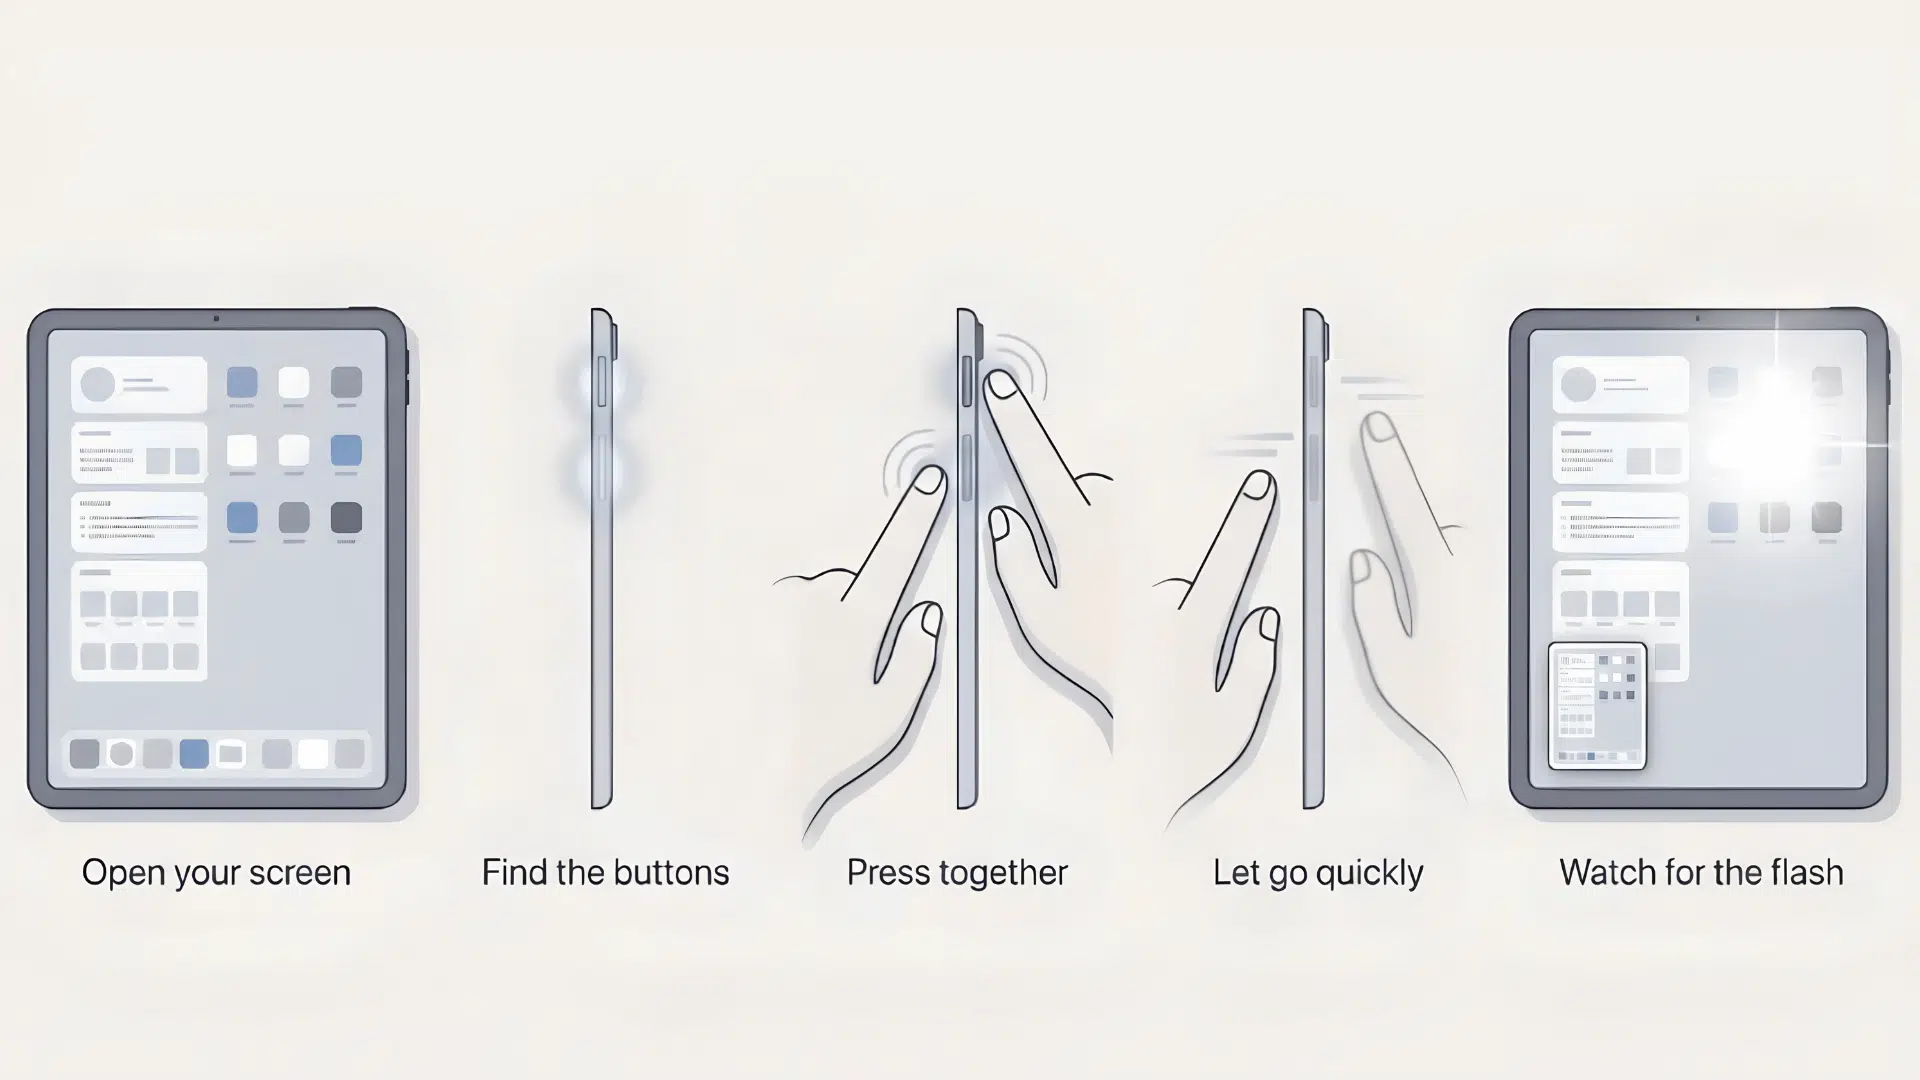
This is the go-to method for most newer iPads that don’t have a Home button. It’s fast once the timing clicks, and it works almost everywhere on the device.
- Open what you want to capture first: Make sure the screen is showing exactly what needs saving before touching any buttons.
- Find the two buttons: The Top button sits on the edge near the top, and the Volume Up button is on the side.
- Press both at the very same moment: They have to land together, or the iPad reads it as two separate commands and nothing happens.
- Let go quickly; don’t hold: A long press brings up the power-off screen instead of grabbing the shot.
- Watch for the flash: The screen blinks white, a shutter sound may play, and a small thumbnail slides into the bottom-left corner.
Hear me out: On my older iPad it took me a couple of tries before the timing felt natural, so don’t worry if your first attempt misses.
2. The Button Combo for Home Button iPads
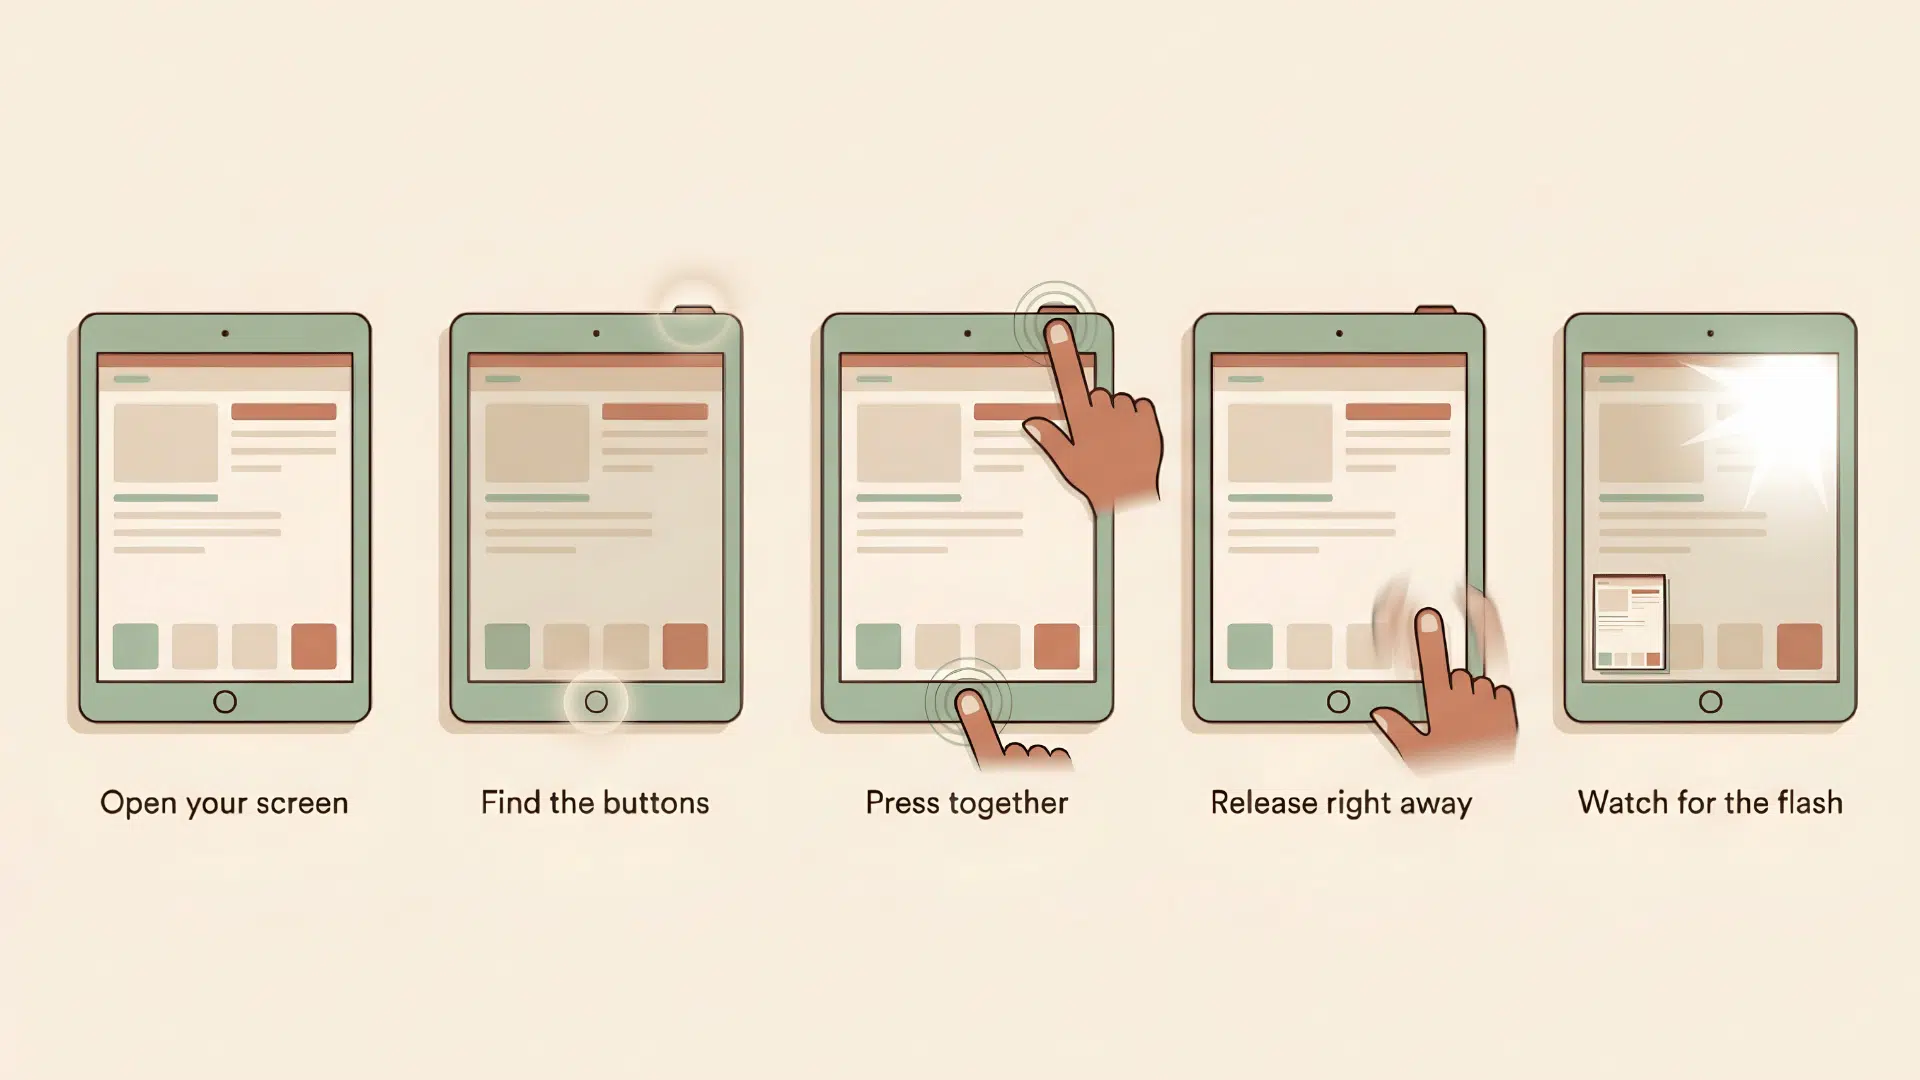
This one is for older iPads that still have that round button below the screen. The idea is the same as above, just with a different button pairing.
The steps below keep it simple and clear:
- Set up your screen first: Have the page, chat, or photo ready and fully loaded before you start.
- Locate both buttons: You’ll use the Top button (or Side button on some models) along with the round Home button.
- Press them together in one go: Both fingers should tap at the same instant for it to register properly.
- Release right away: Holding the Home button too long can wake up Siri instead of taking the shot.
- Look for the signs: A quick flash and an optional shutter click mean you got it.
3. The Apple Pencil Swipe
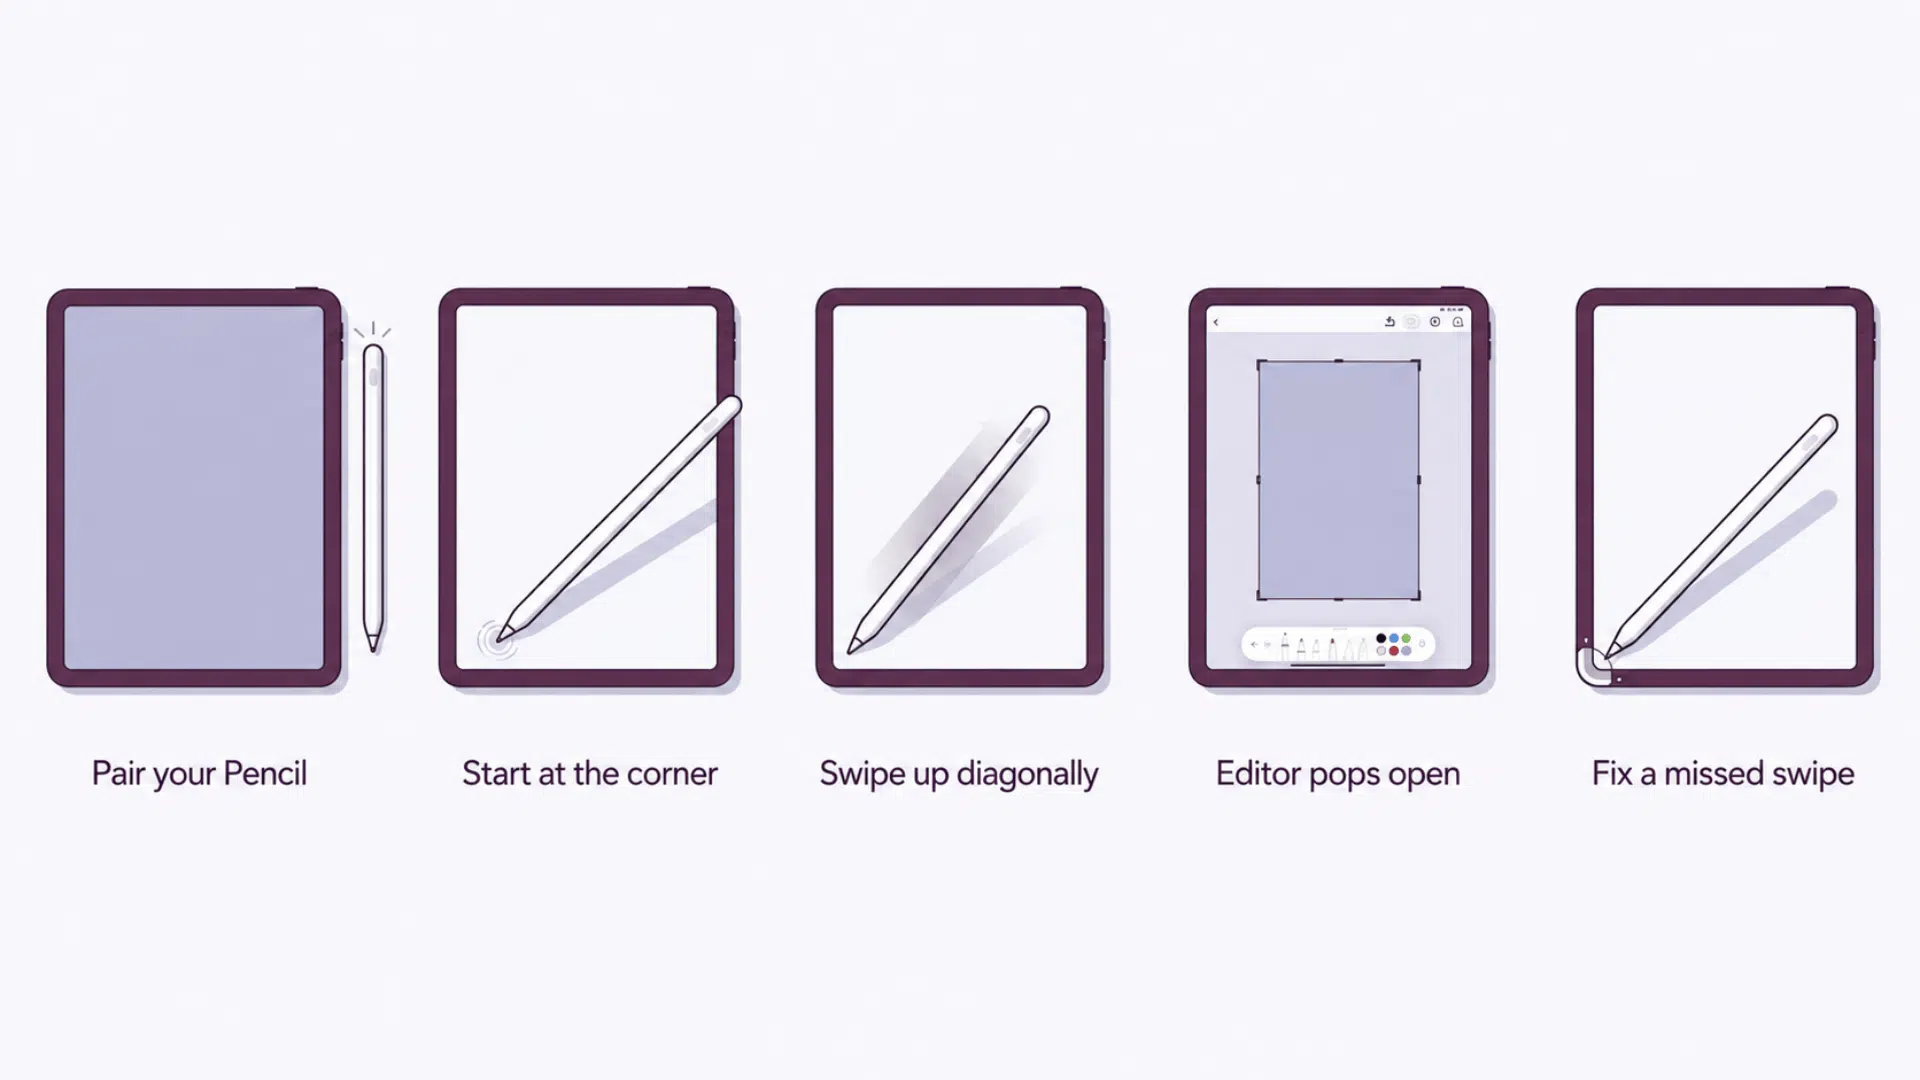
If your iPad works with an Apple Pencil, this is one of the smoothest ways to capture the screen. No buttons needed, and the editor opens instantly.
- Have your Pencil ready and paired: It needs to be connected to your iPad for the swipe to work.
- Start from a bottom corner: Touch the Pencil tip to either the bottom-left or bottom-right corner of the display.
- Swipe up toward the center: Move in one smooth diagonal motion toward the middle of the screen.
- Wait for the editor to pop open: The screenshot appears right away, ready for cropping or drawing.
- Fix a missed swipe easily: If nothing happens, start the swipe closer to the very edge of the corner.
4. AssistiveTouch for Tricky Buttons
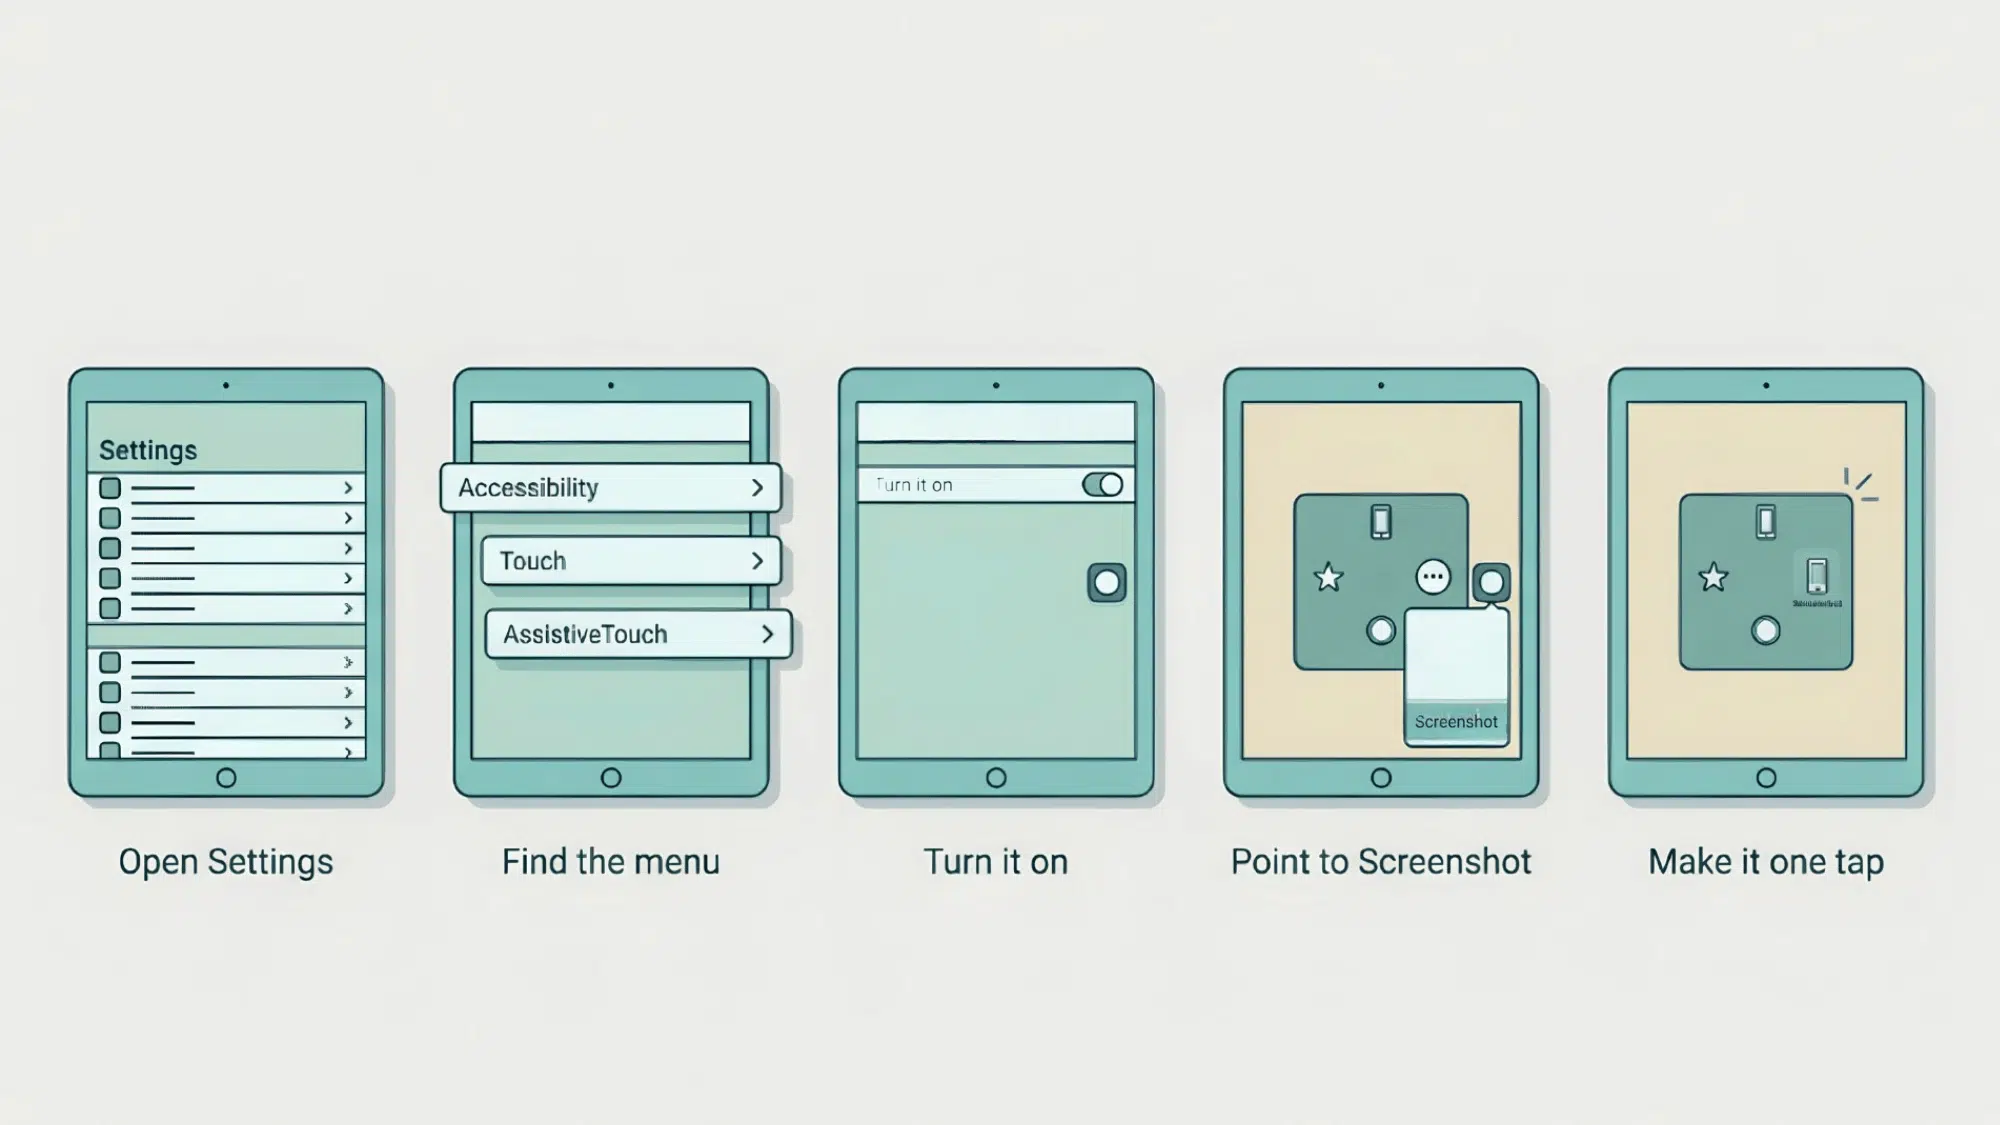
This method is a real help when the physical buttons are worn out, stuck, or just hard to press. It adds a floating button to your screen that does the job with one tap.
Follow these steps to set it up once and use it forever:
- Open your Settings app: Tap into it from the home screen to get started.
- Head to the right menu: Go to Accessibility, then Touch, then AssistiveTouch.
- Switch AssistiveTouch on: A small floating button appears on the edge of your screen.
- Point it to Screenshot: Tap the button, then choose Device, then More, then Screenshot.
- Make it one tap: Customize the top-level menu so Screenshot sits right on the main menu next time.
5. Just Ask Siri
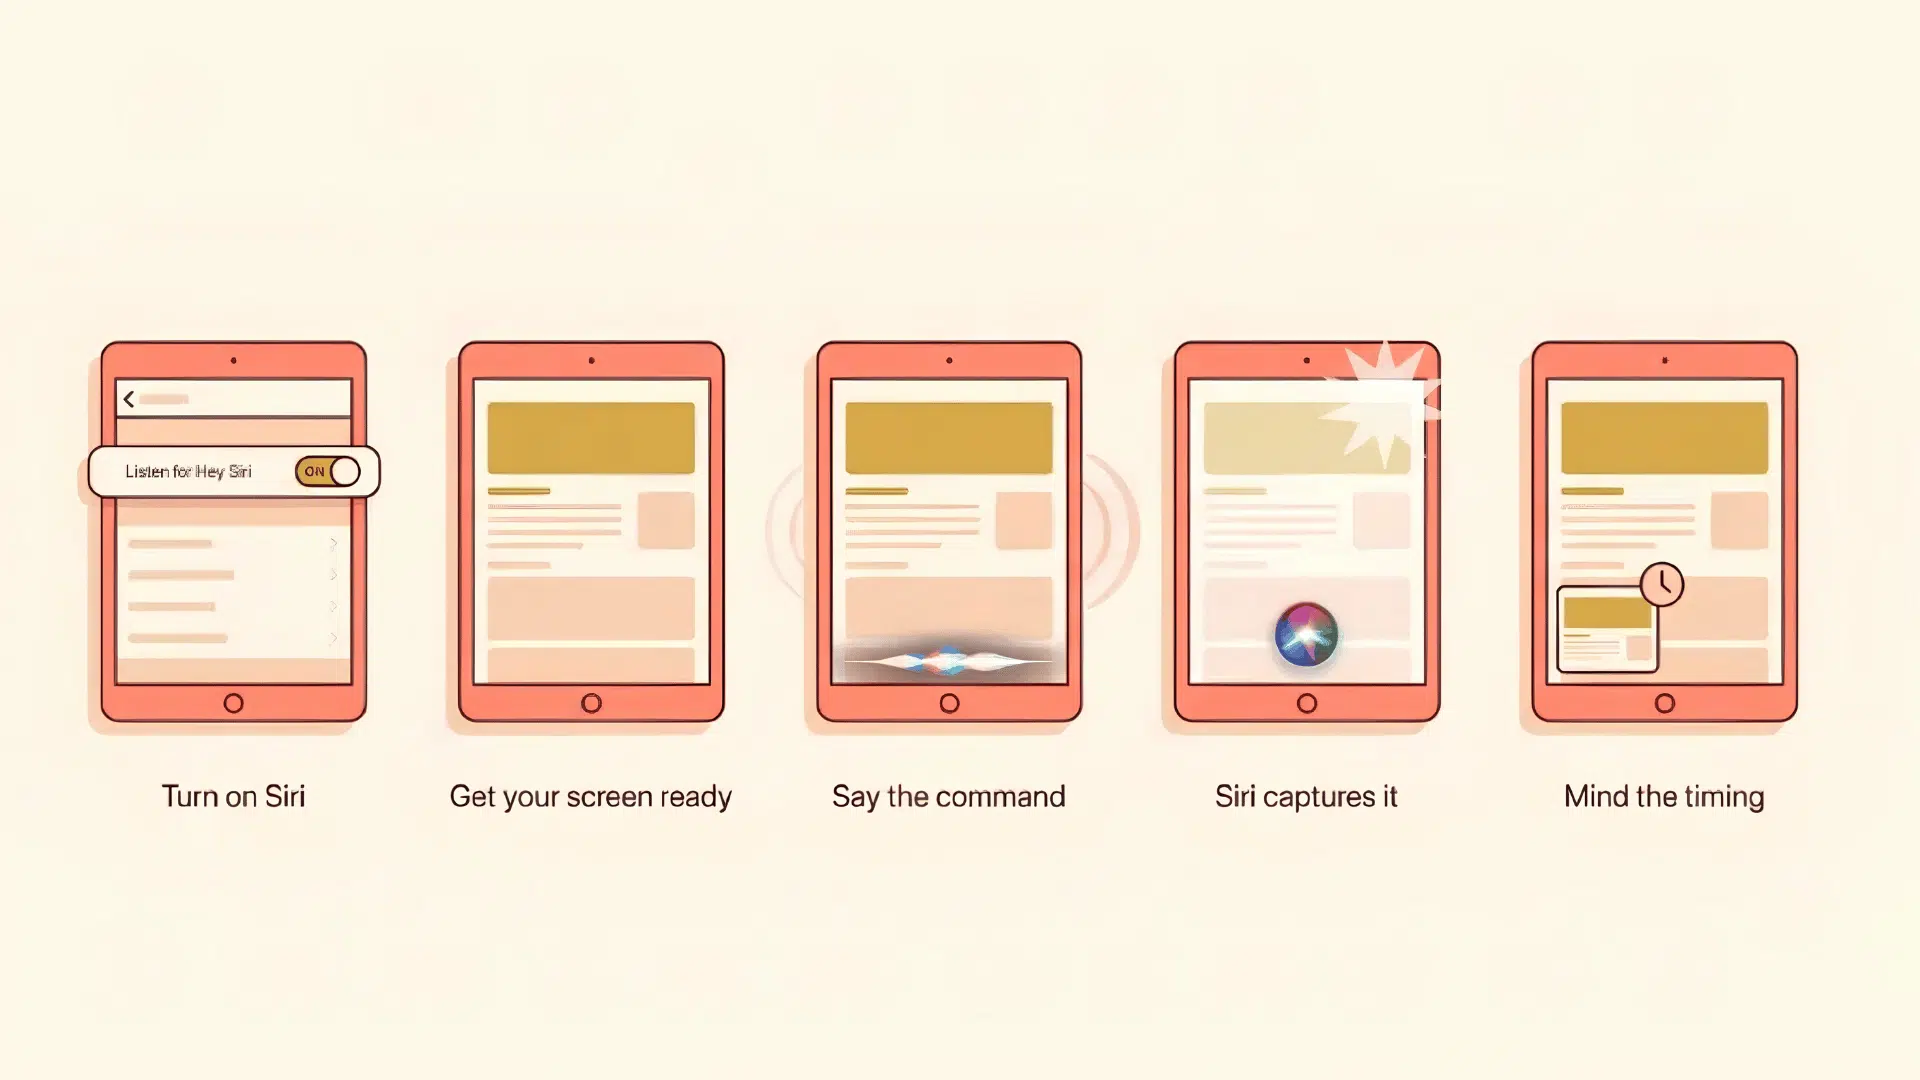
When both hands are busy, Siri can grab the screen with a simple voice command. It’s more of a backup option, but it comes in handy in a pinch.
- Make sure Siri is turned on: Check that “Hey Siri” is enabled in your settings first.
- Get your screen ready: Have whatever you want to capture showing on the display.
- Say the command clearly: Speak “Hey Siri, take a screenshot” in a normal voice.
- Let Siri do the rest: The screen captures on its own the moment Siri finishes listening.
- Keep the timing in mind: It grabs the shot right away, so it’s slightly less precise than the button combos.
6. The Keyboard Shortcut
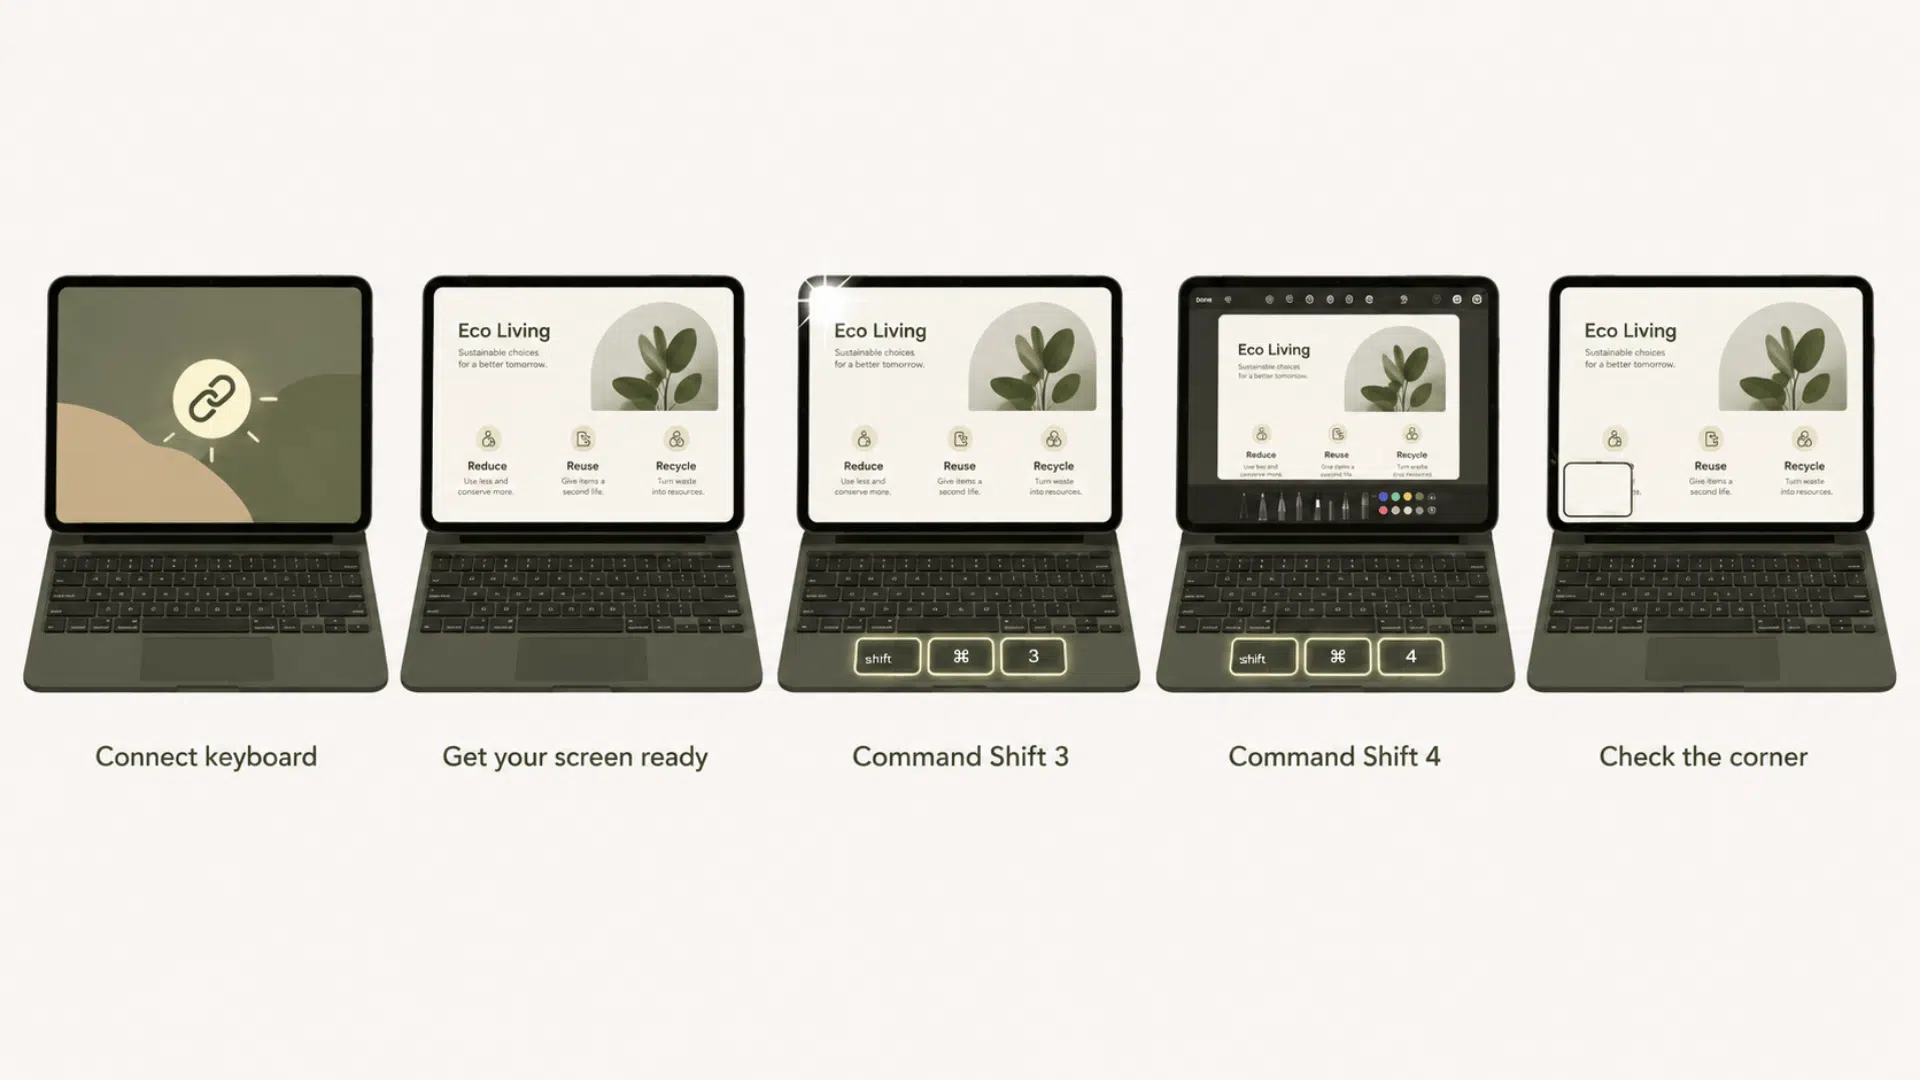
If you’ve got a Magic Keyboard or any Bluetooth keyboard attached, you can skip the buttons entirely. The shared keyboard commands are one of several similarities that come up when comparing MacBook vs iPad, even though the two devices use different operating systems and input methods.
Here’s how to put it to work:
- Connect your keyboard first. Make sure your Magic Keyboard or Bluetooth keyboard is paired and active before you try the shortcut.
- Set up your screen. Have whatever you want to capture showing before you press anything.
- Press Command + Shift + 3. This grabs the whole screen instantly and saves it, just like on a Mac.
- Or press Command + Shift + 4. This takes the shot and drops you straight into the editor for cropping or markup.
- Check the corner. The usual thumbnail pops up in the bottom-left, ready for you to tap or leave to save.
Taking a Screenshot on iPad, According to Real Users
Sometimes the clearest help comes from people who’ve hit the exact same snag. Here are a few real ways to take a screenshot on iPad, shared by people who’ve been there themselves:
Assuming that your iPad has a Home button – to trigger a screenshot, you simultaneously press both the “top” (Sleep/Wake) button and the Home Button. For iPad devices without a Home Button, the process is the same – but instead uses the “up” Volume button. If the timing isn’t right, something other than a screenshot is acheived. – Apple Community
A user on the Apple Support Community couldn’t get their iPad to screenshot at all. Pressing the buttons just closed their app instead. So this was the solution that was suggested.
You could use a Bluetooth or USB keyboard with your iPad and use the keyboard shortcut ⌘ (Command) + ⇧ (Shift) + 3. With iPadOS 13 you could use an Apple Pencil to swipe up from the bottom left corner to take a screenshot. – Apple Community Discussions
A user was asking how to screenshot on a 6th Gen iPad without using the Home button. So this was the solution suggested by another user.
There are two ways to solve this issue. First go to Settings > Multitasking & Gestures on the top change mode to Full Screen Apps. This one will turn your iPad back to use the old feature by swipe up from left bottom to take a screenshot. Second use Apple pencil and swipe up from the left bottom as well. Hope that would help. – A Reddit User
A user updated to iPadOS 26 and found that the new window mode had disabled their favorite screenshot gesture, the swipe-up from the bottom corner. So this was the solution suggested by another user.
There is a keyboard shortcut, it’s the same as of the Mac OS: cmd + shift + 3 and cmd + shift + 4, to take a screenshot, and to take a screenshot and open this edit page, respectively – A Reddit User
One user shared a handy method for anyone with a keyboard connected: one shortcut grabs the full screen, while another takes the shot and opens the edit page straight away, working just like it does on a Mac.
To take a screenshot, press the top button and either the volume button at the same time or alternatively, if the device has a Home button, press the top button and the Home button at the same time.- A Quora User
Where Do iPad Screenshots Get Saved?
Every screenshot you take lands straight in the Photos app. The quickest way I find mine is to open Photos, tap Albums, then scroll to the Screenshots folder.
They’ll also show up in your Recents, mixed in with your regular photos and videos. If you saved one as a full-page PDF, though, check the Files app instead, since those don’t go to Photos.
One thing I’ve learned from taking hundreds of these: they pile up fast. It’s worth clearing out the ones you don’t need every so often, so your storage doesn’t quietly fill up.
Reasons Your Screenshot Shortcut Isn’t Working
Sometimes the buttons just won’t cooperate, and it’s almost always something small. Here’s a quick look at the most common problems, some of which even I faced, what’s causing them, and how to fix each one fast:
| Problem | Why It Happens | How to Fix It |
|---|---|---|
| The screen turns off instead | You held the buttons down too long | Give both buttons a quick tap and release; don’t hold them |
| Siri pops up instead | The Home button was held a beat too long | Press and let go quickly so Siri doesn’t wake up |
| Nothing happens at all | The two buttons didn’t land at the same moment | Press both together in one motion, then try again |
| The volume changes instead | Only the volume button registered | Make sure both fingers press at the exact same time |
| You get a black screenshot | The app is blocking it (common with banking or streaming apps) | Nothing to fix, this is a privacy lock you can’t override |
| You missed the corner thumbnail | It faded before you tapped it | Don’t worry, it still saved. Check the Photos app |
| The Apple Pencil swipe won’t work | You started the swipe too far from the corner | Begin right at the very bottom corner and swipe inward |
| The corner swipe does nothing | The gesture is switched off in Settings | Turn on the corner swipe under Multitasking & Gestures |
| Buttons are worn out or stuck | Physical wear on older iPads | Switch to AssistiveTouch for a one-tap on-screen button |
Most screenshot troubles come down to timing or a setting that’s switched off. Run through the fixes above, and you’ll be back to capturing your screen in no time.
How to Edit and Share Your Screenshot
Editing a screenshot helps you highlight important details, add context, or remove unnecessary parts before sending it to someone. Once your screenshot is ready, sharing it is just a few taps away.
- Crop it down to size. Drag the corner handles inward to trim off anything you don’t need, like the status bar or space around the edges.
- Mark it up with your finger or Pencil. Use the pen, highlighter, and text tools to circle something, add a note, or point an arrow right where it matters.
- Grab the whole webpage. In Safari, tap the thumbnail and choose Full Page at the top to capture an entire scrolling page, then save it as a PDF.
- Share it straight away. Tap the share icon to send your screenshot through Messages, Mail, WhatsApp, or AirDrop without ever leaving the editor.
- Save and find it later. Tap Done, choose Save to Photos, and it’ll be waiting for you in the Screenshots album whenever you need it.
My tip: Tap that thumbnail the moment it appears. It only sticks around for a few seconds, and editing right there is so much faster than digging the screenshot back out of Photos afterward.
Wrapping It Up
So there you go. Now you know how to screenshot on iPad, no matter which model is sitting in your hands right now. Once you nail the button combo or that Apple Pencil swipe, it just clicks.
You won’t even think about it anymore.
Still feeling unsure how to take a screenshot on iPad? Scroll back up, find your model, and give it a try right now. Two seconds, that’s all it takes.
And next time a friend asks you how to take a screenshot on iPad, you’ll be the one showing them how it’s done in a flash.
Frequently Asked Questions
Can You Take a Screenshot of Just One Part of the Screen?
Not directly; capture the full screen first, then crop it down to the part you want.
Will the Other Person Know if You Screenshot Their Message?
No, regular chats like Messages or WhatsApp won’t alert anyone when you take a screenshot.
Can You Record a Video of My Screen Instead of a Screenshot?
Yes, just add Screen Recording to your Control Center and tap the record button.
Do Screenshots Lower the Image Quality of What You Capture?
No, your iPad saves them at full resolution as sharp PNG files.